Getting Started
Orange Widgets are components in Orange Canvas, a visual programming environment of Orange. They represent some self contained functionalities and provide a graphical user interface (GUI). Widgets communicate with each other and pass objects through communication channels to interact with other widgets from left to right.
On this page, we will start with some simple essentials, and then show you how to build a simple widget that will be ready to run within Orange Canvas.
Prerequisites
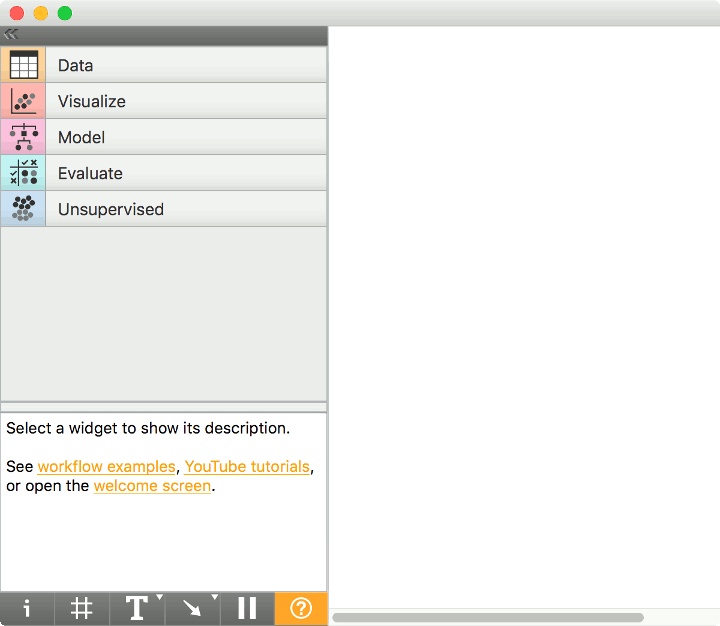
Each Orange widget belongs to a category and has an associated priority within that category. When opening Orange Canvas, a visual programming environment that comes with Orange, widgets are listed in a toolbox on the left:
Each widget has a name description and a set of input/outputs (referred to as the widget’s meta description).
This meta data is discovered at Orange Canvas application startup
leveraging setuptools/distribute and its entry points protocol.
Orange Canvas looks for widgets using an orange.widgets entry point.
Defining a widget
OWBaseWidget is the base class of a widget
in the Orange Canvas workflow.
Every widget in the canvas framework needs to define its meta data. This includes the widget’s name and text descriptions and more importantly its input/output specification. This is done by defining constants in the widget’s class namespace.
We will start with a very simple example. A widget that will output a single integer specified by the user.
from orangewidget.widget import OWBaseWidget, Output
from orangewidget.settings import Setting
from orangewidget import gui

class IntNumber(OWBaseWidget):
    # Widget's name as displayed in the canvas
    name = "Integer Number"
    # Short widget description
    description = "Lets the user input a number"

    # An icon resource file path for this widget
    # (a path relative to the module where this widget is defined)
    icon = "icons/number.svg"

    # Widget's outputs; here, a single output named "Number", of type int
    class Outputs:
        number = Output("Number", int)
By design principle, Orange widgets in an interface are most
often split to control and main area. Control area appears on the left
and should include any controls for settings or options that your widget
will use. Main area would most often include a graph, table or some
drawing that will be based on the inputs to the widget and current
options/setting in the control area.
OWBaseWidget makes these two areas available
through its attributes self.controlArea and self.mainArea.
Notice that while it would be nice for all widgets to have this common
visual look, you can use these areas in any way you want, even
disregarding one and composing your widget completely unlike the
others in Orange.
We specify the default layout with class attribute flags. Here we will only be using a single column (controlArea) GUI.
# Basic (convenience) GUI definition:
#   a simple 'single column' GUI layout
want_main_area = False
#   with a fixed non resizable geometry.
resizing_enabled = False
We want the current number entered by the user to be saved and restored when saving/loading a workflow. We can achieve this by declaring a special property/member in the widget’s class definition like so:
number = Setting(42)
And finally the actual code to define the GUI and the associated widget functionality:
def __init__(self):
    super().__init__()

    from AnyQt.QtGui import QIntValidator
    gui.lineEdit(self.controlArea, self, "number", "Enter a number",
                 box="Number",
                 callback=self.number_changed,
                 valueType=int, validator=QIntValidator())
    self.number_changed()

def number_changed(self):
    # Send the entered number on "Number" output
    self.Outputs.number.send(self.number)
See also
By itself this widget is useless because no widget accepts its output. So let us define a widget that displays a number.
from orangewidget.widget import OWBaseWidget, Input
from orangewidget import gui

class Print(OWBaseWidget):
    name = "Print"
    description = "Print out a number"
    icon = "icons/print.svg"

    class Inputs:
        number = Input("Number", int)

    want_main_area = False

    def __init__(self):
        super().__init__()
        self.number = None

        self.label = gui.widgetLabel(self.controlArea, "The number is: ??")

    @Inputs.number
    def set_number(self, number):
        """Set the input number."""
        self.number = number
        if self.number is None:
            self.label.setText("The number is: ??")
        else:
            self.label.setText("The number is {}".format(self.number))
We define inputs with a class Inputs, just like outputs are defined by Outputs. However, each input must be handled by a class method. We mark the handlers by decorating them; in the above case by putting @Inputs.number before the method’s definition.
Notice how in the set_number method we check whether the number is None. None is sent to the widget when a connection between the widgets is removed or if the sending widget to which we are connected intentionally emptied the channel.
Now we can use one widget to input a number and another to display it.
One more:
from orangewidget.widget import OWBaseWidget, Input, Output

class Adder(OWBaseWidget):
    name = "Add two integers"
    description = "Add two numbers"
    icon = "icons/add.svg"

    class Inputs:
        a = Input("A", int)
        b = Input("B", int)

    class Outputs:
        sum = Output("A + B", int)

    want_main_area = False

    def __init__(self):
        super().__init__()
        self.a = None
        self.b = None

    @Inputs.a
    def set_A(self, a):
        """Set input 'A'."""
        self.a = a

    @Inputs.b
    def set_B(self, b):
        """Set input 'B'."""
        self.b = b

    def handleNewSignals(self):
        """Reimplemeted from OWBaseWidget."""
        if self.a is not None and self.b is not None:
            self.Outputs.sum.send(self.a + self.b)
        else:
            # Clear the channel by sending `None`
            self.Outputs.sum.send(None)
See also
After learning what an Orange Widget is and how to define it on a toy example, we will build semi-useful widgets that can work together with the existing Orange Widgets.
We will start with a very simple one, that will receive a dataset on the input and will output a dataset with 10% of the data instances. We will call this widget OWDataSamplerA (OW for Orange Widget, DataSampler since this is what widget will be doing, and A since we prototype a number of this widgets in our tutorial).
A ‘Demo’ package
First, in order to include our new widgets in the Orange Canvas’s toolbox we will create a dummy python project named orange-demo. A great starting point for creating an Orange add-on is Example Add-on.
The layout should be:
orange-demo/
      setup.py
      orangedemo/
                  __init__.py
                  OWDataSamplerA.py
and the orange-demo/setup.py should contain
from setuptools import setup

setup(name="Demo",
      packages=["orangedemo"],
      package_data={"orangedemo": ["icons/*.svg"]},
      classifiers=["Example :: Invalid"],
      # Declare orangedemo package to contain widgets for the "Demo" category
      entry_points={"orange.widgets": "Demo = orangedemo"},
      )
Note that we declare our orangedemo package as containing widgets from an ad hoc defined category Demo.
Following the previous examples, our module defining the OWDataSamplerA widget starts out as:
import numpy
import Orange.data
from orangewidget.widget import OWBaseWidget, Input, Output
from orangewidget.utils.widgetpreview import WidgetPreview
from orangewidget import gui
class OWDataSamplerA(OWBaseWidget):
name = "Data Sampler"
description = "Randomly selects a subset of instances from the dataset"
icon = "icons/DataSamplerA.svg"
priority = 10
class Inputs:
data = Input("Data", Orange.data.Table)
class Outputs:
sample = Output("Sampled Data", Orange.data.Table)
want_main_area = False
def __init__(self):
super().__init__()
# GUI
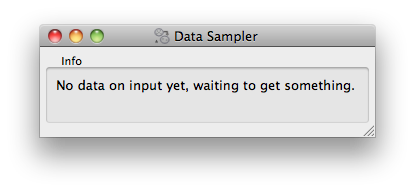
box = gui.widgetBox(self.controlArea, "Info")
self.infoa = gui.widgetLabel(box, 'No data on input yet, waiting to get something.')
self.infob = gui.widgetLabel(box, '')
The widget defines an input channel “Data” and an output channel called
“Sampled Data”. Both will carry tokens of the type Orange.data.Table.
In the code, we will refer to the signals as Inputs.data and Outputs.sample.
Channels can carry tokens of arbitrary types. However, the purpose of widgets is to talk with other widgets, so as one of the main design principles we try to maximize the flexibility of widgets by minimizing the number of different channel types. Do not invent new signal types before checking whether you cannot reuse the existing.
As our widget won’t display anything apart from some info, we will place the two labels in the control area and surround it with the box “Info”.
The next four lines specify the GUI of our widget. This will be simple, and will include only two lines of text of which, if nothing will happen, the first line will report on “no data yet”, and second line will be empty.
In order to complete our widget, we now need to define a method that will
handle the input data. We will call it set_data(); the name is arbitrary,
but calling the method set_<the name of the input> seems like a good practice.
To designate it as the method that accepts the signal defined in Inputs.data,
we decorate it with @Inputs.data.
@Inputs.data
def set_data(self, dataset):
if dataset is not None:
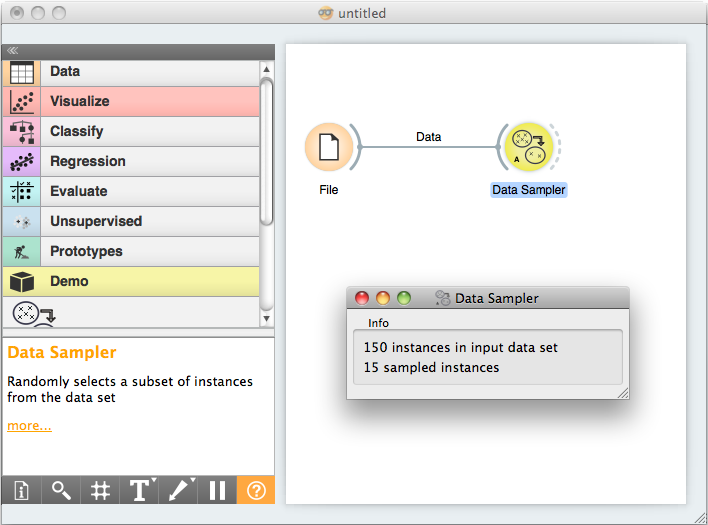
self.infoa.setText('%d instances in input dataset' % len(dataset))
indices = numpy.random.permutation(len(dataset))
indices = indices[:int(numpy.ceil(len(dataset) * 0.1))]
sample = dataset[indices]
self.infob.setText('%d sampled instances' % len(sample))
self.Outputs.sample.send(sample)
else:
self.infoa.setText('No data on input yet, waiting to get something.')
self.infob.setText('')
self.Outputs.sample.send("Sampled Data")
The dataset argument is the token sent through the input
channel which our method needs to handle.
To handle a non-empty token, the widget updates the interface reporting on number of data items on the input, then does the data sampling using Orange’s routines for these, and updates the interface reporting on the number of sampled instances. Finally, the sampled data is sent as a token to the output channel defined as Output.sample.
Although our widget is now ready to test, for a final touch, let’s
design an icon for our widget. As specified in the widget header, we
will call it
DataSamplerA.svg
and put it in icons subdirectory of orangedemo directory.
With this we can now go ahead and install the orangedemo package. We
will do this by running pip install -e . command from
within the orange-demo directory.
Note
Depending on your python installation you might need administrator/superuser privileges.
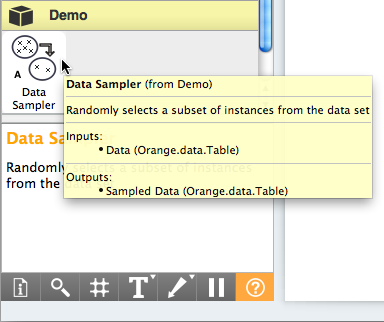
For a test, we now open Orange Canvas. There should be a new pane in a widget toolbox called Demo. If we click on this pane, it displays an icon of our widget. Try to hover on it to see if the header and channel info was processed correctly:
Now for the real test. We put the File widget on the schema (from Data pane) and load the iris.tab dataset. We also put our Data Sampler widget on the scheme and open it (double click on the icon, or right-click and choose Open):
Now connect the File and Data Sampler widget (click on an output connector of the File widget, and drag the line to the input connector of the Data Sampler). If everything is ok, as soon as you release the mouse, the connection is established and, the token that was waiting on the output of the file widget was sent to the Data Sampler widget, which in turn updated its window:
To see if the Data Sampler indeed sent some data to the output, connect it to the Data Table widget:

Try opening different data files (the change should propagate through your widgets and with Data Table window open, you should immediately see the result of sampling). Try also removing the connection between File and Data Sampler (right click on the connection, choose Remove). What happens to the data displayed in the Data Table?
Testing Your Widget Outside Orange Canvas
For debugging purposes, we want to be able to run widgets standalone: if the
file with the widget code is executed as a main script, it should show the
widget and feed it some suitable data. The simplest way to do so is to use
orangewidget.utils.WidgetPreview and pass it the data for the
default signal.
if __name__ == "__main__":
    WidgetPreview(OWDataSamplerA).run(Orange.data.Table("iris"))