Tutorial (Settings and Controls)
In the previous section of our tutorial we have just built a simple sampling widget. Let us now make this widget a bit more useful, by allowing a user to set the proportion of data instances to be retained in the sample. Say we want to design a widget that looks something like this:
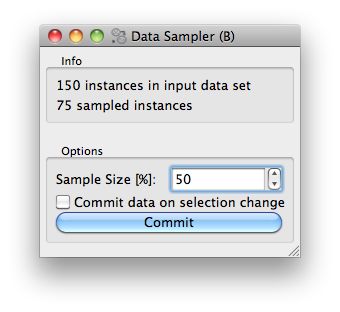
What we added is an Options box, with a spin entry box to set the sample size, and a check box and button to commit (send out) any change we made in setting. If the check box with “Commit data on selection change” is checked, than any change in the sample size will make the widget send out the sampled dataset. If datasets are large (say of several thousands or more) instances, we may want to send out the sample data only after we are done setting the sample size, hence we left the commit check box unchecked and press “Commit” when we are ready for it.
This is a very simple interface, but there is something more to it. We want the settings (the sample size and the state of the commit button) to be saved. That is, any change we made, we want to save it so that the next time we open the widget the settings is there as we have left it
Widgets Settings
Luckily, since we use the base class OWBaseWidget,
the settings will be handled just fine. We only need to tell which variables
we want to use for persistent settings.
In our widget, we will use two settings variables, and we declare this in the widget class definition (after the inputs, outputs definitions).
class OWDataSamplerB(OWBaseWidget):
    name = "Data Sampler (B)"
    description = "Randomly selects a subset of instances from the dataset."
    icon = "icons/DataSamplerB.svg"
    priority = 20

    class Inputs:
        data = Input("Data", Orange.data.Table)

    class Outputs:
        sample = Output("Sampled Data", Orange.data.Table)

    proportion = settings.Setting(50)
    commitOnChange = settings.Setting(0)
All settings have to specify their default value. When a widget is
created the widget’s members are already restored and ready to use
in its __init__ method.
The contents of the two variables (self.proportion and
self.commitOnChange) will be saved upon closing our widget.
In our widget, we won’t be setting these variables directly,
but will instead use them in conjunction with GUI controls.
Controls and module gui
We will use the orangewidget.gui to create/define the gui.
With this library, the GUI definition part of the options box is a bit
dense but rather very short
        box = gui.widgetBox(self.controlArea, "Info")
        self.infoa = gui.widgetLabel(box, 'No data on input yet, waiting to get something.')
        self.infob = gui.widgetLabel(box, '')

        gui.separator(self.controlArea)
        self.optionsBox = gui.widgetBox(self.controlArea, "Options")
        gui.spin(self.optionsBox, self, 'proportion',
                 minv=10, maxv=90, step=10, label='Sample Size [%]:',
                 callback=[self.selection, self.checkCommit])
        gui.checkBox(self.optionsBox, self, 'commitOnChange',
                     'Commit data on selection change')
        gui.button(self.optionsBox, self, "Commit", callback=self.commit)
        self.optionsBox.setDisabled(True)
We are already familiar with the first part - the Info group
box. To make widget nicer, we put a separator between this and Options
box. After defining the option box, here is our first serious
gui control: a orangewidget.gui.spin().
The first parameter specifies its parent widget/layout, in this case
self.optionsBox (the resulting widget object will automatically
append itself to the parent’s layout). The second (self) and
third ('proportion') define the property binding for the spin box.
I.e. any change in the spin box control will automatically be propagated
to the self.proportions and vice versa - changing the value of
self.proprotions in the widget code by assignment
(e.g. self.proprotions = 30) will update the spin box’s state to match.
The rest of the spin box call gives some parameters for the
control (minimum and maximum value and the step size), tells about the
label which will be placed on the top, and tells it which functions to
call when the value in the spin box is changed. We need the first
callback to make a data sample and report in the Info box what is the
size of the sample, and a second callback to check if we can send this
data out. In orangewidget.gui, callbacks are either references
to functions, or a list with references, just like in our case.
With all of the above, the parameters for the call of
orangewidget.gui.checkBox() should be clear as well. Notice that
this and a call to orangewidget.gui.spin() do not need a parameter
which would tell the control the value for initialization: upon
construction, both controls will be set to the value that is
pertained in the associated setting variable.
That’s it. Notice though that we have, as a default, disabled all the controls in the Options box. This is because at the start of the widget, there is no data to sample from. But this also means that when process the input tokens, we should take care for enabling and disabling. The data processing and token sending part of our widget now is
    @Inputs.data
    def set_data(self, dataset):
        if dataset is not None:
            self.dataset = dataset
            self.infoa.setText('%d instances in input dataset' % len(dataset))
            self.optionsBox.setDisabled(False)
            self.selection()
        else:
            self.dataset = None
            self.sample = None
            self.optionsBox.setDisabled(False)
            self.infoa.setText('No data on input yet, waiting to get something.')
            self.infob.setText('')
        self.commit()

    def selection(self):
        if self.dataset is None:
            return

        n_selected = int(numpy.ceil(len(self.dataset) * self.proportion / 100.))
        indices = numpy.random.permutation(len(self.dataset))
        indices = indices[:n_selected]
        self.sample = self.dataset[indices]
        self.infob.setText('%d sampled instances' % len(self.sample))

    def commit(self):
        self.Outputs.sample.send(self.sample)

    def checkCommit(self):
        if self.commitOnChange:
            self.commit()
You can now also inspect the complete code
of this widget. To distinguish it with a widget we have developed in the
previous section, we have designed a special
icon for it.
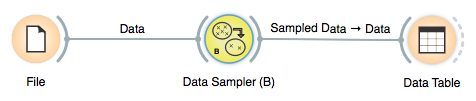
If you wish to test this widget in the Orange Canvas, put its code in
the orangedemo directory we have created for the previous widget and try
it out using a schema with a File and Data Table widget.
Well-behaved widgets remember their settings - the state of their checkboxes and radio-buttons, the text in their line edits, the selections in their combo boxes and similar.
Persisting defaults
When a widget is removed, its settings are stored to be used as defaults for future instances of this widget.
Updated defaults are stored in user’s profile. It’s location depends on the operating system: (%APPDATA%Orange<version>widgets on windows, ~/Library/ApplicationSupport/orange/<version>/widgets on macOS, ~/.local/share/Orange/<version>/widgets on linux) Original default values can be restored by deleting files from this folder, by running Orange from command line with –clear-widget-settings option, or through Options/Reset Widget Settings menu action.
Schema-only settings
Some settings have defaults that should not change. For instance, when using a Paint Data widget, drawn points should be saved in a workflow, but a new widget should always start with a blank page - modified value should not be remembered.
This can be achieved by declaring a setting with a schema_only flag. Such setting is saved with a workflow, but its default value never changes.
Context dependent settings
Context dependent settings are settings which depend on the widget’s input. For instance, the scatter plot widget contains settings that specify the attributes for x and y axis, and the settings that define the color, shape and size of the examples in the graph.
An even more complicated case is the widget for data selection with which one can select the examples based on values of certain attributes. Before applying the saved settings, these widgets needs to check their compliance with the domain of the actual data set. To be truly useful, context dependent settings needs to save a setting configuration for each particular dataset used. That is, when given a particular dataset, it has to select the saved settings that is applicable and matches best currently used dataset.
Saving, loading and matching contexts is taken care of by context
handlers. Currently, there are only two classes of context handlers
implemented. The first one is the abstract ContextHandler
and the second one is DomainContextHandler in which the
context is defined by the dataset domain and where the settings
contain attribute names. The latter should cover most of your needs,
while for more complicated widgets you will need to derive a new
classes from it. There may even be some cases in which the context is
not defined by the domain, in which case the
ContextHandler will be used as a base for your new
handler.
Contexts need to be declared, opened and closed. Opening and closing usually takes place (in the opposite order) in the function that handles the data signal. This is how it looks in the scatter plot (the code is somewhat simplified for clarity).
@Input.data
def set_data(self, data):
    self.closeContext()
    self.data = data
    self.graph.setData(data)

    self.initAttrValues()

    if data is not None:
        self.openContext(data.domain)

    self.updateGraph()
    self.sendSelections()
In general, the function should go like this:
Do any clean-up you need, but without clearing any of the settings that need to be saved. Scatter plot needs none.
Call
self.closeContext(); this ensures that all the context dependent settings (e.g. attribute names from the list boxes) are remembered.Initialize the widget state and set the controls to some defaults as if there were no context retrieving mechanism. Scatter plot does it by calling
self.initAttrValues()which assigns the first two attributes to the x and y axis and the class attribute to the color. At this phase, you shouldn’t call any functions that depend on the settings, such as drawing the graph.Call
self.openContext(data.domain)(more about the arguments later). This will search for a suitable context and assign the controls new values if one is found. If there is no saved context that can be used, a new context is created and filled with the default values that were assigned at the previous point.Finally, adjust the widget according to the retrieved controls. Scatter plot now plots the graph by calling
self.updateGraph().
When opening the context, we provide the arguments on which the context
depends. In case of DomainContextHandler, which scatter plot uses, we
can give it a Orange.data.Domain. Whether a saved context can be
reused is judged upon the presence of attributes in the domain.
If the widget is constructed appropriately (that is, if it strictly uses
orangewidget.gui controls instead of the Qt’s), no other
administration is needed to switch the context.
Except for declaring the context settings, that is. Scatter plot has this in its class definition
settingsHandler = DomainContextHandler()
attr_x = ContextSetting("")
attr_y = ContextSetting("")

auto_send_selection = Setting(True)
toolbar_selection = Setting(0)
color_settings = Setting(None)
selected_schema_index = Setting(0)
settingsHandler = DomainContextHandler() declares that Scatter plot uses
DomainContextHandler. The attr_x and attr_y are
declared as ContextSetting.
Migrations
At the beginning of this section of the tutorial, we created a widget with a setting called proportion, which contains a value between 0 and 100. But imagine that for some reason, we are not satisfied with the value any more and decide that the setting should hold a value between 0 and 1.
We update the setting’s default value, modify the appropriate code and we are done. That is, until someone that has already used the old version of the widget open the new one and the widget crashes. Remember, when the widget is opened, it has the same settings that were used the last time.
Is there anything we can do, as settings are replaced with saved before the __init__ function is called? There is! Migrations to the rescue.
Widget has a special attribute called settings_version. All widgets start with a settings_version of 1. When incompatible changes are done to the widget’s settings, its settings_version should be increased. But increasing the version by it self does not solve our problems. While the widget now knows that it uses different settings, the old ones are still broken and need to be updated before they can be used with the new widget. This can be accomplished by reimplementing widget’s methods migrate_settings (for ordinary settings) and migrate_context (for context settings). Both method are called with the old object and the version of the settings stored with it.
If we bumped settings_version from 1 to 2 when we did the above mentioned change, our migrate_settings method would look like this:
def migrate_settings(settings, version):
   if version < 2:
     if "proportion" in settings:
        settings["proportion"] = settings["proportion"] / 100
Your migration rules can be simple or complex, but try to avoid simply forgetting the values, as settings are also used in saved workflows. Imagine opening a complex workflow you have designed a year ago with the new version of Orange and finding out that all the settings are back to default. Not fun!
Warning
If you change the format of an existing setting in a backwards-incompatible way, you will also want to change the name of that setting. Otherwise, older versions of Orange won’t be able to load workflows with the new setting format.
There are two helper functions you can use.
Orange.widget.settings.rename_settings(settings, old_name, new_name)
does the obvious operation on settings, which can be either a dictionary
or a context, thus it can be called from migrate_settings or
migrate_context.
Another common operation may be upgrading your widget from storing variable
names (as str) to storing variables (instances of classes derived from
Variable). In a typical scenario, this happens when combo boxes are upgraded to
using models. Function
Orange.widget.settings.migrate_str_to_variable(settings, names=None)
makes the necessary changes to the settings listed in names. names can be
a list of setting names, a single string or None. In the latter case, all
settings that may refer to variables (that is two-elements tuples consisting
of a string and an int) are migrated.
What about situations in which some context settings become inapplicable due
to some changes in the widget? For instance, a widget that used to accept any
kind of variables is modified so that it requires a numeric variable?
Context with categorical variables will match and be reused … and crash the
widget. In these (rare) cases, migrate_context must raise exception
Orange.widget.settings.IncompatibleContext and the context will be
removed.
So take some time, write the migrations and do not forget to bump the settings_version when you do breaking changes.