Channels and Tokens
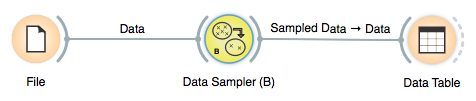
Our data sampler widget was, regarding the channels, rather simple and linear: the widget was designed to receive the token from one widget, and send an output token to another widget. Just like in an example schema below:
There’s quite a bit more to channels and management of tokens, and we will overview most of the stuff you need to know to make your more complex widgets in this section.
Multi-Input Channels
In essence, the basic idea about “multi-input” channels is that they can be used to connect them with several output channels. That is, if a widget supports such a channel, several widgets can feed their input to that widget simultaneously.
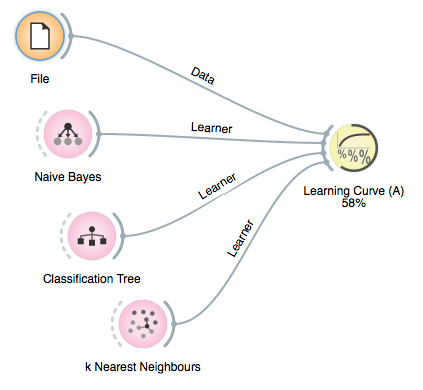
Say we want to build a widget that takes a dataset and test various predictive modeling techniques on it. A widget has to have an input data channel, and this we know how to deal with from our previous lesson. But, somehow differently, we want to connect any number of widgets which define learners to our testing widget. Just like in a schema below, where three different learners are used:
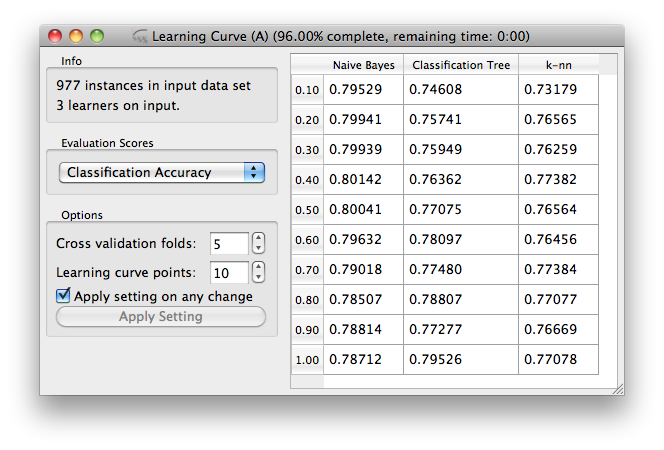
We will here take a look at how we define the channels for a learning curve widget, and how we manage its input tokens. But before we do it, just in brief: learning curve is something that you can use to test some machine learning algorithm in trying to see how its performance depends on the size of the training set size. For this, one can draw a smaller subset of data, learn the classifier, and test it on remaining dataset. To do this in a just way (by Salzberg, 1997), we perform k-fold cross validation but use only a proportion of the data for training. The output widget should then look something like:
Now back to channels and tokens. Input and output channels for our widget are defined by
    class Inputs:
        data = Input("Data", Table)
        learner = MultiInput("Learner", Learner)
Notice that everything is pretty much the same as it was with
widgets from previous lessons, the only difference being that we use a
MultiInput in the input declaration,
which says that this input can be connected to outputs of multiple widgets.
Handlers of multiple-input signals must decorate a triplet of methods for the set/insert/remove operations.
The insert method takes an integer index and the input object instance and must insert the object at the position specified by index.
    @Inputs.learner.insert
    def insert_learner(self, index, learner):
        """Insert a learner at index"""
        self.learners.insert(index, LearnerData(learner, None, None))
The set method updates the input at existing specified index.
    @Inputs.learner
    def set_learner(self, index: int, learner):
        """Set the input learner at index"""
        # update/replace a learner on a previously connected link
        item = self.learners[index]
        item.learner = learner
        item.results = None
        item.curve = None
Finally the remove method removes the input at the specified index.
    @Inputs.learner.remove
    def remove_learner(self, index):
        """"Remove a learner at index"""
        # remove a learner and corresponding results
        del self.learners[index]
We store the learners (objects that learn from data) and the associates computed results in an list of LearnerData objects.
class LearnerData:
    def __init__(
            self,
            learner: Learner,
            results: Optional[Results] = None,
            curve: Optional[Sequence[float]] = None,
    ) -> None:
        self.learner = learner
        self.results = results
        self.curve = curve
Note that in this widget the evaluation (k-fold cross
validation) is carried out just once given the learner, dataset and
evaluation parameters, and scores are then derived from class
probability estimates as obtained from the evaluation procedure. Which
essentially means that switching from one to another scoring function
(and displaying the result in the table) takes only a split of a
second. To see the rest of the widget, check out
its code.
Using Several Output Channels
There’s nothing new here, only that we need a widget that has several output channels of the same type to illustrate the idea of the default channels in the next section. For this purpose, we will modify our sampling widget as defined in previous lessons such that it will send out the sampled data to one channel, and all other data to another channel. The corresponding channel definition of this widget is
    class Outputs:
        sample = Output("Sampled Data", Orange.data.Table)
        other = Output("Other Data", Orange.data.Table)
We used this in the third incarnation of data sampler widget, with essentially the only
other change in the code in the selection() and commit()
functions
    def selection(self):
        if self.dataset is None:
            return

        n_selected = int(numpy.ceil(len(self.dataset) * self.proportion / 100.))
        indices = numpy.random.permutation(len(self.dataset))
        indices_sample = indices[:n_selected]
        indices_other = indices[n_selected:]
        self.sample = self.dataset[indices_sample]
        self.otherdata = self.dataset[indices_other]
        self.infob.setText('%d sampled instances' % len(self.sample))
    def commit(self):
        self.Outputs.sample.send(self.sample)
        self.Outputs.sample.send(self.otherdata)
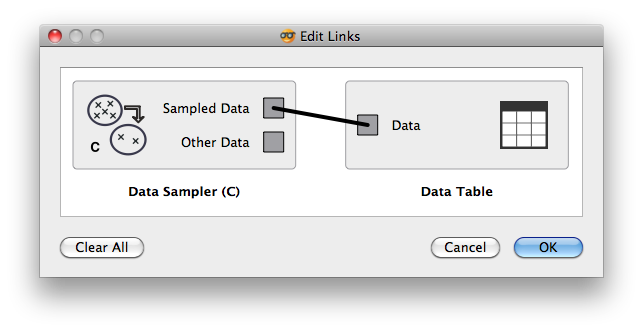
If a widget that has multiple channels of the same type is connected to a widget that accepts such tokens, Orange Canvas opens a window asking the user to confirm which channels to connect. Hence, if we have just connected Data Sampler (C) widget to a Data Table widget in a schema below:
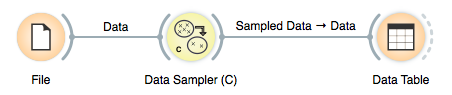
we would get a following window querying users for information on which channels to connect:
Default Channels (When Using Input Channels of the Same Type)
Now, let’s say we want to extend our learning curve widget such that it does the learning the same way as it used to, but can - provided that such dataset is defined - test the learners (always) on the same, external dataset. That is, besides the training dataset, we need another channel of the same type but used for training dataset. Notice, however, that most often we will only provide the training dataset, so we would not like to be bothered (in Orange Canvas) with the dialog which channel to connect to, as the training dataset channel will be the default one.
When enlisting the input channel of the same type, the default
channels have a special flag in the channel specification list. So for
our new learning curve
widget, the channel specification is
    class Inputs:
        data = Input("Data", Table, default=True)
        test_data = Input("Test Data", Table)
        learner = MultiInput("Learner", Learner)
That is, the Train Data channel is a single-token
channel which is a default one (third parameter). Note that the flags can
be added (or OR-d) together so Default + Multiple is a valid flag.
To test how this works, connect a file widget to a learning curve widget
and - nothing will really happen:
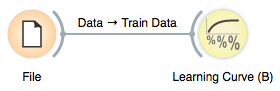
That is, no window with a query on which channels to connect to will open, as the default “Train Data” was selected.
Explicit Channels
Sometimes when a widget has multiple outputs of different types, some
of them should not be subject to this automatic default connection selection.
An example of this is in Orange’s Logistic Regression widget that outputs
a supplementary ‘Coefficients’ data table. Such outputs can be marked with
and Explicit flag, which ensures they are never
selected for a default connection.